Getting Started with BEM
What is BEM?
BEM - or “Block Element Modifier” is a methodology that helps you build complex CSS components. In other words, it’s a way of naming your CSS classes in order to accomplish a few difficult things:
- Avoiding Conflicts
- Improving Code Organization
- Easily Namespacing Components
BEM is just one of many ways to organize your CSS classes, and some of it’s biggest competition comes from OOCSS, SMACSS and ACSS. I am not going to compare the pros/cons of these CSS methodologies in this post, but I think you should look through all of them and make your own decisions if you are planning on building a project that will contain more than a few-thousand lines of CSS.
Poorly organized CSS becomes exponentially harder to debug and build on top of. It can actually become a bit of a performance bottleneck as you run into really large CSS files due to redudancy that reduce pageload times. In this tutorial, I will walk you through the basics of BEM so you can better organize and maintain your CSS codebase.
Getting Started with BEM
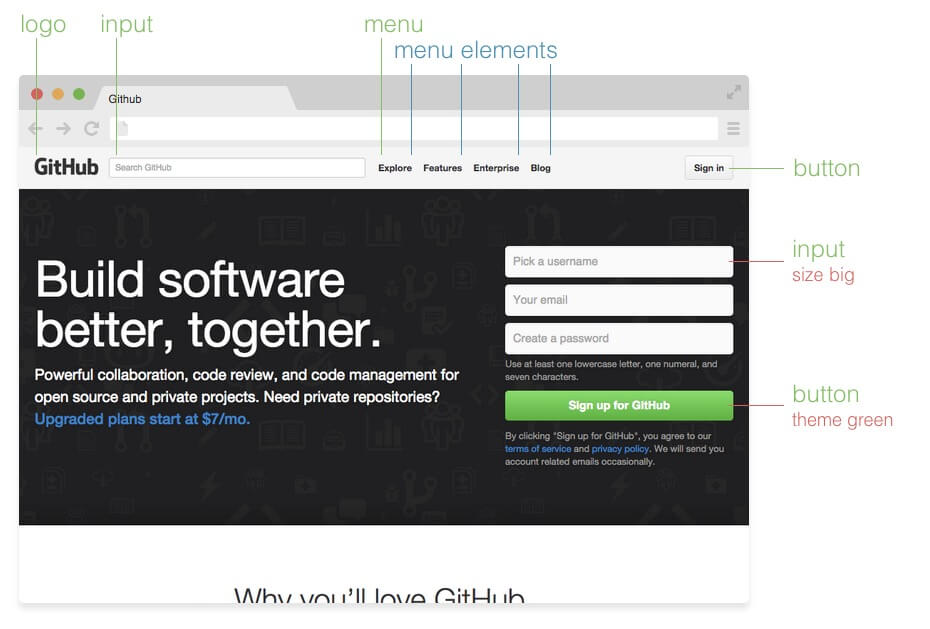
One of the benefits of using BEM over other CSS naming methodologies is that BEM is very straitforwards and shouldn’t be too confusing to pick up. BEM is actually just an acryonym which stands for “Block, Element, Modifier”. The BEM acryonym is actually very descriptive of how your CSS class names should be organized. In BEM, “Block”, “Element” and “Modifier” all are important terms which refer to various parts of a component styled in CSS:
- Block: A standalone component, e.g. header, container, menu, or input
- Element: A part of a block that has no standalone purpose and is tied to a block, e.g. menu item or header title
- Modifier: A flag on a block or an element. Modifies the default behavior, e.g. menu item disabled, or header title secondary
Lets imagine that we have a component that a single post in a web forum. We can break this component down to a few important UI components:
- Post: a single forum post
- Title: the title of a forum post
- Reply Button: A button to reply to a forum post
- Disabled Reply Button: for when you are not able to reply to a forum post
In HTML/HBS and BEM we can represent this component like this:
<div class="post">
    <div class="post__title">My Post</div>
    <!-- if isReplyEnabled -->
        <div class="post__reply-button--enabled"></div>
    <!-- else -->
        <div class="post__reply-button--disabled"></div>
    <!-- end if -->
</div>
In this example, our block element is “post” - a container for all sub elements. The elements in this example are the “post__title”, and “post__reply-button”. The “post” block is seperated from it’s elements by two underscores (__). Finally, the modifiers are “–enabled” and “–disabled”.
To summarize our component, we created a block which is a container for elements. Inside of this block we made a few elements - both of whom have modifiers attached. The block contains elements which are capible of being visually modified as a result of modifiers. Additional modifiers could change color, size, font-weight, etc. In CSS we could style this markup:
.post {
    width: 500px;
    height: 300px;
    background-color: #fff;
    border-radius: 2px;
    padding: 15px;
}
.post__title {
    font-weight: 700;
    font-size: 2em;
}
.post__reply-button {
    width: 25px;
    height: 20px;
    border-radius: 2px;
    background-color: #fff;
}

.post__reply-button--enabled {
    @extend .post__reply-button;
    cursor: pointer;
}

.post__reply-button--disabled {
    background-color: #fff;
    pointer-events: none;
}
Conclusion
And that’s about all there is to writing BEM style CSS. BEM will help you maintain growing codebases, and save you from a nightmare once your codebase gets to a large (thousands of lines of CSS) scale.